Showing posts with label furniture. Show all posts

Wednesday, January 13, 2021

Kitchen and Dining Room Makeovers

Recently I posted about a change that I'd made in my dining room. Prior to Christmas, I had a media cabinet in the dining room serving as a buffet, except it's filled with DVD's and CD's. It looked like this:


 However, after Christmas I moved the baker's rack from the kitchen and put it in the dining room.


I fitted it with my fancy dishes and some serving pieces, and I love the way it looks - plus, it makes more sense to have this in the dining room instead of a media cabinet. But you might be wondering why I took it out of the kitchen in the first place. The answer is this:


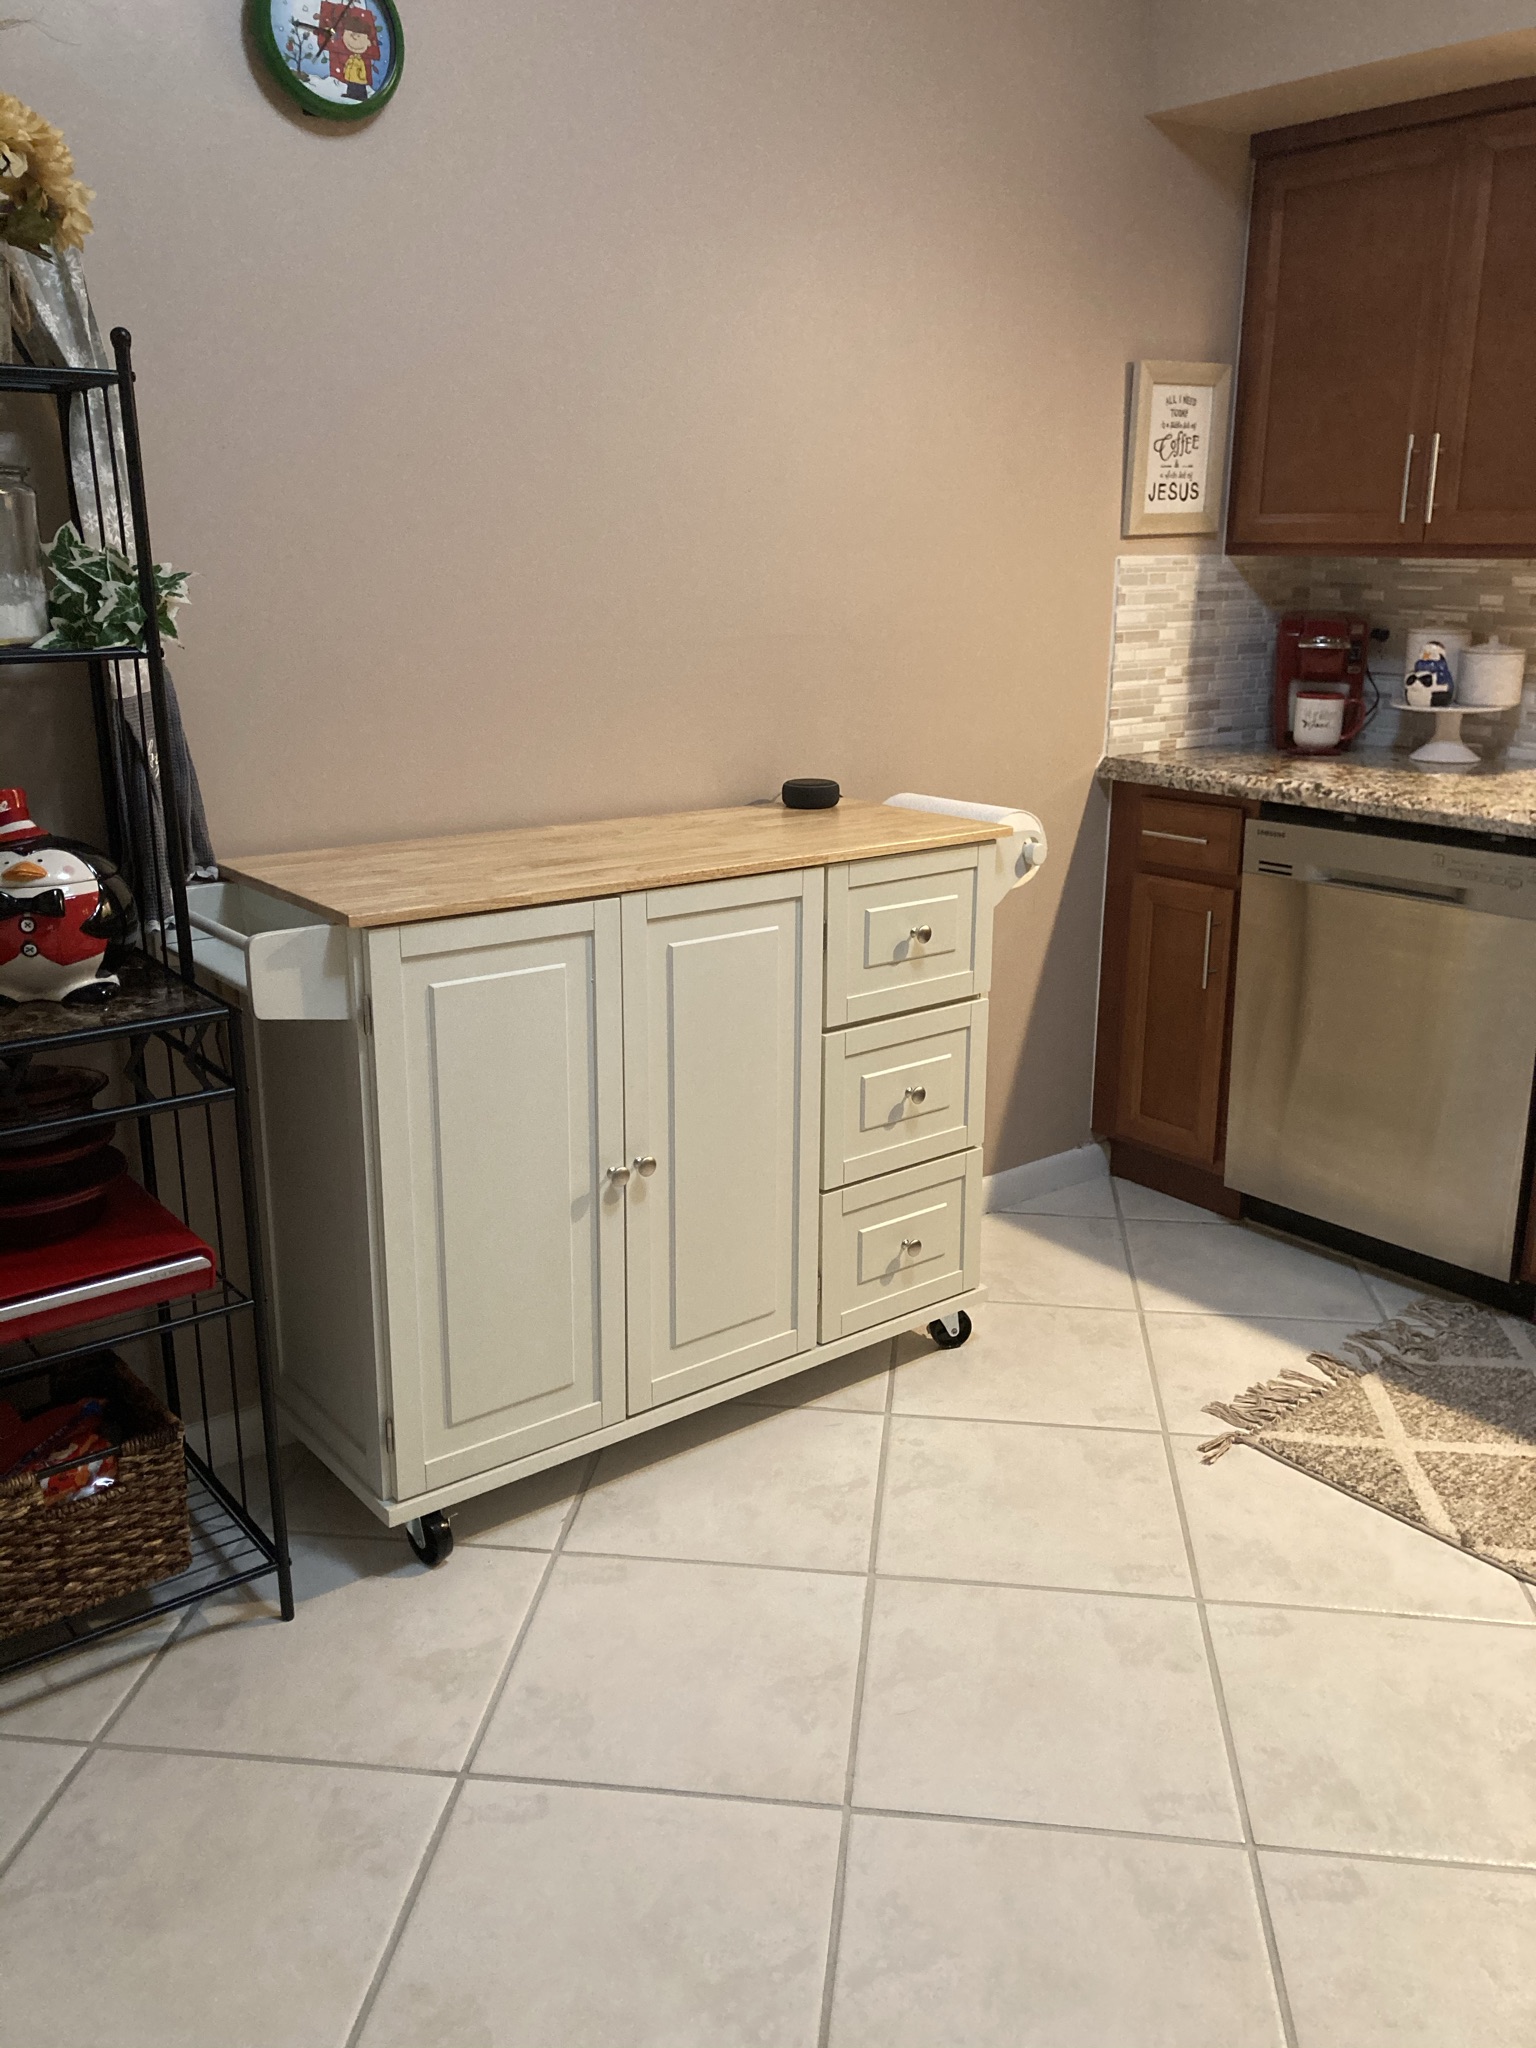
What is this mess you ask? Why, it's a project! Actually, it's my Christmas gift from my daughter and son-in-law. They gave me a kitchen island! I'd told my daughter months before that I wanted a kitchen island because my kitchen, while comfortable and very pretty, doesn't have a whole lot of counter space. In my old house I had a peninsula that was about 8 or 9 feet long, so I had tons of food prep space. This kitchen is much smaller, with less counter space, so prepping food was a bit more challenging. I'd looked at some kitchen islands on Amazon and was considering building one from premade cabinets from Lowe's, when my wonderful daughter gave me this one. I couldn't wait to put it together! No really, I love putting furniture together and building stuff. I'm weird like that.


I was surprised at how easy this island was to put together. If you're interested, this is the Home Styles Liberty Kitchen Cart with Wood Top from Amazon. It's available in black or white; mine, as you can see, is white. It's pretty solid and well made.


I meant to take more pictures putting it together, but once I get in the zone I forget about those things. It didn't take me very long to assemble; not counting pauses to eat or take care of other things, it probably took me 1 - 1 1/2 hours. I only had my son help me twice - once to turn it over, and then again whenever I put the top on because it was too heavy for me alone. Otherwise it was really easy and the instructions were clear.


I was pleasantly surprised at the amount of storage space in this cabinet. I'm especially glad that it has three drawers, since my kitchen only has two drawers. That, in my opinion, was a design flaw by the previous owner whenever she remodeled the kitchen. Two small drawers in a kitchen aren't enough storage for silverware and cooking utensils, let alone anything else that could go in a kitchen drawer. This island gives me plenty of space so that I have things close at hand whenever I'm cooking.

Of course, what I mostly wanted this island for was counter space, and this one didn't disappoint.


On the back of the island is a flap of wood. It can be kept down this was to save space. Then, whenever I need more counter space,


it can be extended out! It almost doubles the counter space, which is wonderful!

I put it in the kitchen right after Christmas but before I'd taken down all the Christmas decor. It was a bit tight and too cluttered for me, which is why I took down my Christmas decor a little earlier than usual.


Before I put the baker's rack in the dining room I moved whatever I could into the island to see how it would fit. 


I got so much stuff in there without having it crowded. I've moved some things out and put other things inside since this picture was taken, based on my needs, but it still fits everything comfortably. Once I moved the baker's rack to the dining room, I decided on what I wanted to do next.


Originally I'd intended to put up floating shelves above the island for storage, but once I realized how well everything fit in the island I decided against it. I didn't want to put up shelves just to put random items up that had no use, other than to collect dust. Instead, I shopped my house for decor for this area.


I got this Gather sign from Kirkland's years ago on clearance. I had it over the bookshelf in the office, but I decided it would look better here. I also put the clock that was here previously just above it, and I really like the way it looks.

And, in case anyone's wondering, the media cabinet found its way into my bedroom.


I don't have a tv in my bedroom, nor do I want one, but I like how this fills in this spot. I love this media cabinet and didn't want to get rid of it, so I knew I would find a place for it. 

So I guess it's really three rooms that got a mini makeover! Just wait, there's more to come. 

Wednesday, September 2, 2020

The Itch To Switch

 One of my favorite YouTubers is Ashley from Til Vacuum Do Us Part. She loves switching her furniture and bedrooms around to create a new look, a process she calls the Itch to Switch. I know that itch only too well. As a teenager living with my parents, I would often rearrange the furniture in the living room. Thankfully my mom didn't mind; she knew I'd clean as I went, and she wasn't going to stop me :D. We switched bedrooms a few times, though it was hard because there wasn't a whole lot of space in the hallway of our apartment. Once I was married and had a home of my own, moving furniture and decor or painting a room became so commonplace it didn't surprise anyone. 

When we first moved into our new home, I set up the living room furniture similar to how the previous owner had hers set up. The sectional was against the stairwell. It worked perfectly, especially at Christmas because I wanted the tree over by the sliding glass doors.


When the spring came around and we were stuck at home because of the shelter in place order, I got the itch to switch. I flipped the sectional and put it in front of the sliding glass doors.


I really do like it in this configuration. It's open and welcoming whenever you come up the stairs. But as I began thinking of fall and winter, the holidays and the decor changes, I got the itch to switch again. The Christmas tree, I believe, looks best in the corner by the sliding glass door. Granted, Christmas is still over 3 months away, but I start decorating for fall in a couple of weeks. I couldn't help wanting to start the new season with a fresh look. The itch to switch took over and the rearranging began.


I started by  moving all the furniture off the rug and giving it a good vacuum (pause to appreciate vacuum lines). I got this rug from Costco, I wanna say three or four years ago, and it has held up beautifully. 


I pulled the cushions off the sectional to make it easier to move, and while I was at it I vacuumed underneath. No matter how careful I try to be, dust and crumbs get in there.


I lifted the coffee table to make it easier to move off the rug, and found this under it. My son E's drawings from when he was about three years old. You can't leave them alone for a second, y'all!


I should mention that I was doing this on my own; my son E was still asleep. I don't mind doing this by myself; I'm thankful I still have the strength and ability to do it. Unfortunately, you don't always catch the mistakes until afterwards. Everything looked good so far so I continued moving furniture.


I brought the chair and ottoman over and set it up like it was before but on the opposite side of the living room. 

I replaced my current decor because I'm not ready to start decorating for fall yet. By now I was pretty satisfied with how the living room looked and I began focusing on the dining room. 

My dining room table is a six seater with a removable leaf. Whenever I put the sectional in front of the sliding glass doors, I took the leaf out of the table to make it smaller.


Now that the sectional was switched, I felt like the table looked too small. So I got the leaf and added it to the table. I also changed the configuration of the chairs so they fit properly on the rug.


 By this time, as you can imagine, I was tired. The furniture is heavy, I was cleaning as I went, and I needed a break. I went and fixed lunch, woke my son up for school, and went about my day. As I did, I began to notice something that really bugged me.


It's probably hard to tell from this picture; it might be something that would only annoy me. But the rug was not centered. I don't think it's very noticeable unless you see it in person. The rug was over to the far right instead of being centered in front of the fireplace and bookcases, which then caused everything else to be off-center as well. Every time I walked by I saw it and I knew I was gonna have to fix it, but by then my neighbor was home from work and moving heavy furniture around would disturb him. I waited till this morning and got to work again.


Moving the rug meant moving all the furniture off the rug again, scooting it over and putting everything back. I should have take better pictures, sorry about that. I moved the furniture a bit more to the center and moved the chair and ottoman further back. It looks more balanced now which was what was lacking before. While I was at it, I took my olive tree from the kitchen and put it here in the corner. I really like how it looks. I don't know if it'll stay here permanently; it might go back before the day's end, but I'm enjoying it in the meantime.

I like switching my furniture for two reasons. First, it gives the room a new look without spending any money, and if I don't like it I can switch it back. Second, it allows the furniture to be used more evenly. Let's be honest, everyone has their favorite spot on the couch. Whenever you sit down it's always in the same place. If you look at someone's couch, you can see where that spot is because that's where most of the wear on the furniture is. By moving my sectional around I'm forced to change my favorite spot; it's technically the same spot in the room, just not the same spot on the furniture piece. I also rotate my cushions once a month so that they too wear out evenly. I find this gives the furniture a longer life.

This won't be the only itch to switch going on in my house this month. Fall is coming, and that means pumpkins and pillows and throw blankets, oh my! Come back soon!  

Friday, August 14, 2020

Let's Take A Tour - The Master Bedroom

 Last year as we prepared for our move I had to make some tough decisions. There was sorting, packing, and a lot of decluttering. We were moving into a smaller place, and although this house is chock full of storage for such a small space, it was still much less than what I'd been accustomed to for the previous 19 years. I ordered the packing pod and made the commitment to take only what fit inside the pod - if it didn't fit, it had to go. I wasn't completely faithful to this promise; there were the items, such as clothes and toiletries, that we had to take to my daughter's house until moving day. There was also a TV cabinet that didn't fit in the pod that my son-in-law's parents graciously took to their house and brought back whenever we finally moved. But there was one room that didn't make it into the pod: the master bedroom. Once we had most of the furniture and boxes in, it became clear that neither the king size bedframe, mattress, box springs, or nightstands were going to fit. The pod was packed solid and there was no more room.  Yet I wasn't bothered or concerned about it. We'd had this furniture for 17 years - yes, that includes the mattress - and it was time for a change. As my realtor put it, the bedroom furniture represented the past, the marriage that had ended. I actually looked forward to upgrading and making the master bedroom a place that looked and felt like me.

Of course, it meant shopping the way I like to shop: on a budget. As I sat in my daughter's dining room waiting for closing day, I scanned furniture sites like Wayfair, Overstock, Target, and of course my fall back, Amazon. I knew I wanted something classic, something that looked fresh without being too modern or trendy, that would stand the test of time. I looked at a lot of furniture, y'all. I'm happy to say I found what I wanted and I couldn't be happier.

I ordered my bed and mattress off of Amazon. I'd bought my son E a Zinus bed whenever his older brother moved to Central Florida and his dad sold the twin bed he'd had before. It's a good solid bed that's also pretty comfortable. Having experience with it before helped make the decision easy. The really nice part about this bed is that all the components come apart and fit inside the headboard. It made unpacking and putting together a breeze. I went with a queen size bed because, even though a king size would easily fit in this bedroom, I had no need for anything larger. That meant, of course, that I also had to buy all new bedding. I found the bedspread and sheets at Costco. I've purchased sheets from Costco before, and not only are they very affordable ($15.99 for the set that includes 4 pillow cases and one each flat and fitted sheets) they are so soft and comfortable! The same is true with this bedspread, which can also be used as a blanket and cost $19.99. I knew I could upgrade the bedding later on if I wanted to, but this is so pretty I'm in no rush. The throw pillows were ones I already had. The walls in the master bedroom are painted in the same sage green as the dining room, a color that is near and dear to my heart. It was easy for me to accessorize because many of my home decor pieces matched or complimented this color. And what about those wood floors?! They are laminate but a good quality, and they look gorgeous! 


I ordered the nightstands even before ordering the bed. These are the Picket House Channing nightstands from Walmart, and I love them because they have that classic, traditional look that pairs well with other design styles. I ordered two even though technically I only need one, but symmetry in design is a must for my brain. My original plan was to just get the nightstands and put all my folded clothes in there just as I'd done with my old furniture, but I ran into a problem. These nightstands are much smaller than my old ones, and only have two drawers where my old ones had three. Because of that I went ahead and ordered the matching chest of drawers. I decided against getting a dresser with a mirror because I wanted to find a makeup vanity instead. All the decor seen here are items I had in my old house except for the lamp. I purchased the set at TJ Maxx - or rather, I got them from there for free, thanks to a gift card I'd received. 

I looked for a makeup vanity from several different sites and stores, but all were small and expensive and not what I wanted. Ultimately what I found was a writing desk from Target that fit the bill (it's no longer available at Target but you can find it here):


I put it in a corner of the room where I could get some natural light from the window while covering what may not show very clearly in this picture: the internet router (it's behind my makeup on top of the desk). In this development, the association decided they didn't want the unsightly internet boxes in the front of the homes, so they put them in the back. This meant that, to get the best reception, the router would have to be in the room closest to the box (or at least that's what the internet provider explained to me). In my case, it means the master bedroom. This is pretty upsetting, because not only is the router there but so is that ugly cable and another box on the other side of the wall. My hope was that I'd be able to cover it with the vanity, but it didn't look right in the corner, and if I centered it the router would be on the floor in plain view. I needed another solution. This is what I came up with, and I love it.

Yep, curtains! Floor to ceiling curtains that cover everything on the floor but don't cover the window or the views. That was my main concern, and why I originally hesitated to add curtains. I didn't want to cover the windows and the lovely plantation shutters, nor did I want a long curtain rod over the window. Instead, I used two smaller curtain rods on either side, so that the curtains are just decorative. Of course, they're also functional, but they don't appear to be because the internet equipment is nicely hidden.

Here is what the bedroom looks like now whenever you first walk in:

The picture above the bed was in my living room at the old house, but it worked perfectly in here. I bought it years ago from Kirkland's. Other than the lamps, the only new thing here is the rug which I picked up from Ross for $44.99. I wanted something soft and cushy underneath the bed and this one looks and feels so lush! 


This is the view from the far left corner. I was using a dining room chair at the vanity for awhile. I looked for a chair for the vanity that would match the headboard on my bed, but they were way too expensive and not the right size. I found this chair at TJ Maxx for $39.99 and it's so perfect it looks like it came with the desk. The chair in the corner is actually a piece from the living room sectional. I thought it looked so good here in the corner and made it not look like a big empty space. The shelf on the wall was in the entryway of our old house. The metal art piece is new; I found it at Hobby Lobby. The wall looked so blank that I knew it needed something. Even my son E said it looked really good there.

The mint green pillows and the throw are from Walmart, and the lumbar pillow was a Target clearance find. I don't like to spend a lot on throw pillows; they can be very pricey and, let's be honest, they go out of style quick. Yes, I can buy pillow covers, but I've been able to find throw pillows for cheaper than some pillow covers - this one was just $8.

Even though I had to completely furnish this bedroom, I'm happy to say I managed to stay under budget. Everything that I bought - including furnishings, bedding, and decor - came to just over $1400.00. Some folks spend that just on the mattress! But even though I furnished it on a budget, it's still a cozy, comfortable room that I can enjoy and relax in.

Just outside my bedroom is the laundry closet, and the other door leads to the next space in this home tour - the master bathroom. Stay tuned!

Wednesday, July 22, 2020

Let's Take A Tour - The Dining Room

Just beyond the living room area is our dining room.


As I mentioned in my previous post, we have a living room/dining room combo. However, because of the way the house is laid out, the dining area is off to the side in its own designated space as opposed to one big room with a dining table directly behind the sofa as in other home layouts. I like this sort of "separation" where everything is open yet it's still clear what is the living room and what is the dining room. Shall we take a closer look?


This is the table that I had at our old house, the one I gel stained and put new cushions on the seats. I took the leaf out since we don't need it right now and this space is smaller than what we had at the old house. I can fit the table with the leaf in just fine, but I decided to keep it compact for the time being. The rug is a new addition that I picked up at Ross for $30. The plantation shutters, curtains, even the little flower decor above the window were left by the previous owner. 


The decor on the table is also from the old house, though this wasn't how I had it decorated in the past. The tray was a Target clearance find for $12, as was the pitcher. The flower arrangement is simply some Dollar Tree hydrangeas and some eucalyptus from Target. The owl is a candle holder, though I've never burned any candle in it. I got it several years ago from Walmart for under $5.


The salt and pepper shakers were a great score from the Walmart clearance aisle. They are from the Pioneer Woman collection, and I got the set for $4. They go beautifully with my dishes. The runner is from the Magnolia line at Target. I believe I paid $15 for it, a bargain considering the quality and it's a nice neutral design appropriate for all seasons.


The opposite wall is mirrored, a popular design style in the 80's. I don't care for it myself, but I understand removing it can be pretty pricey, and it's not a project I'd want to tackle on my own. Not only is it dangerous, I'm concerned what the drywall behind it will look like after 32 years. I try to look on the positive side: it makes the room look way bigger than it actually is.

If you've seen pictures of my previous home, you know that I also stained the china cabinet that went with this dining room set. It was a beautiful piece that I'd had for 19 years, but in the end I chose not to bring it with me, so I sold it. In its place I put this cabinet:


It's not a buffet or sideboard. It's actually a tv cabinet that I had in our family room and which houses our DVD/CD collection. I downsized quite a bit of our DVD's but we still have a lot. This cabinet was purchased off of Amazon back in 2016 for $210. I've gotten compliments because of how well it looks with the dining room table; I've even been asked if they are a set, which they definitely are not.

 
I decided to keep the decor on top simple, since everything reflects off the mirror. That gorgeous decorative bottle has been with me for 20 years. We purchased it at a fair and watched as the flowers were painted on it. Beside it are pictures of my kids when they were younger.


One of the things I did change was the light fixture in the dining room. This was original to the house and didn't match anything else. It's pretty, but it looked out of place.


This is the ceiling fan in the living room. The bronze finish on this, as well as the style, clashed with the brushed nickel of the light fixture in the dining room and open to the living room.


I found this lighting fixture on Home Depot's website. Since we were in the middle of quarantine I wasn't able to go to the actual store, so online ordering was the next best thing. I wish I hadn't been impatient, because while I like this light fixture, I don't love it. It is a way better match than the old light fixture, but it's just okay. I may change it again in the future. Or I may keep it. I haven't decided yet.

You're probably asking, so if the cabinet holds DVD's and CD's, where is all the stuff that was in the china cabinet? Let me show you:


Across the dining room and behind the living room is this gorgeous dry bar. I didn't know if this was something the previous owner had built in, but I've since learned that it's original to the house, as are the mirrors and glass shelves. She did upgrade the countertop to granite, though, and in doing so gave it a high end look.


On the left there are two drawers which I use as my "junk" drawers. There are no drawers to the right, because this cabinet is plumbed for a wet bar. The previous owners didn't care for one, which is fine since I have no desire for a wet bar either.


There is plenty of storage space inside, so that not only am I able to put away everything that was in my china cabinet, but also some of my cookbooks and seasonal decor. 


Again, I wanted to keep this area uncluttered, so I took out my cake stand (which I've had since my days selling Kingdom Treasures 15 years ago) and put this pitcher full of tulips on top. I love these tulips that I bought off of Amazon. They are very high quality and look realistic. I bought the pitcher from Kirkland's a while back. I love white pitchers for flower arrangements, and they always have pretty ones at Kirkland's.


This decorative plate has special meaning to me. It is from Puerto Rico and was given to me by a very sweet Puertorican lady who was one of my vendors whenever I worked as a purchasing agent years ago. That company went bankrupt during the recession in 2008, but I kept in touch with the lady who gave it to me. Sadly, she passed away unexpectedly in 2015, making this gift an even more precious treasure. 


When we first moved in I wondered what in the world I would do with these glass shelves? They are attached to the mirrors, so unless I remove the mirrors I can't take the shelves off. As I mentioned before, I'm not the biggest fan of the mirrors, but taking them down would probably mean extensive repairs to whatever is behind it. It wasn't until Christmas that I came to appreciate them. I set up my Christmas village on this sideboard. 


I wish I'd taken a picture of the finished product! I began putting little pine trees to make it look like a mountain overlooking the village. Unfortunately I decluttered a bunch of my village pieces, thinking I wouldn't need them. I didn't want to spend a ton of money, so I went to Walmart and purchased some small village houses which I put on the shelves. It turned out so cute! I guess I'm gonna have to recreate it this Christmas so I can post proper pictures. After Christmas I decided to put my wine glasses up there instead, along with some dessert plates that were a wedding gift from a dear friend and a few other decor pieces. It's simple yet elegant.

I'm so glad I was able to keep my dining room table. I was afraid it would be too big to fit in a smaller home, but here it works great, and I can still host our small Thanksgiving day feast. Next, the room that isn't really a room. Can you figure out what that is?