Showing posts with label washer and dryer. Show all posts

Tuesday, August 11, 2020

We Interrupt This House Tour To Bring You...

 ...a laundry room makeover! In my previous post (you can read it here) I mentioned that I'd ordered a few things to update and make my laundry room (actually, laundry closet) into a room I liked looking at. I got my order on Thursday but I was dog sitting for my daughter who spent the weekend at Disney World with her husband and some friends. I didn't want to make a mess in the house while having a dog underfoot (and I mean that literally; he follows me everywhere). So I decided to get started on the work Monday morning.

I started by taking everything off the shelves, hooks, and the top of the dryer where I keep a laundry basket. I took down the shelves and gave them a good cleaning.

I took the covers off the electric outlets as well. I thought about switching out this outlet; the color is so dingy, like much of what was in this laundry closet. Ultimately I decided I wouldn't tackle that project just yet, not because I don't know how but because I was doing this on a budget and I hadn't planned on it. The outlet covers are less than $4 which was no biggie. I took a quick trip to Home Depot and got the covers along with a saw for a project I hope to do at my daughter's house. 

I took a quick pic of the wall before taking the washer and dryer out. Y'all, it looked awful! I was really looking forward to covering all this nastiness. But, floors first.

I spared y'all the worst of it. This is after having scrubbed the floor and baseboards with Krud Kutter, which I highly recommend. This product actually cleaned the linoleum better than anything I'd tried before. The stains, unfortunately, are there to stay. I decided not to paint the baseboards because they're hidden behind the appliances. The floor is too, and I actually considered tiling only the front that would be seen, but it's such a small space and I didn't want the machines to be on an uneven surface. 

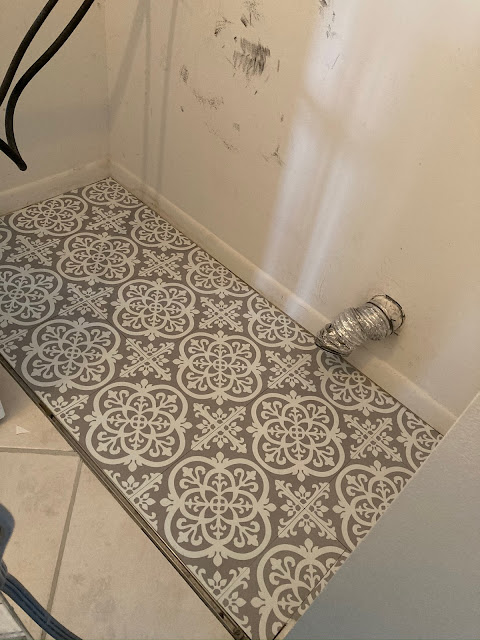
I used vinyl peel and stick tiles. They are easy to use, easy to cut, and look really nice. This part of the project took about an hour to complete, and I'm thrilled with the results.

Isn't it gorgeous?!?! I will say this, these tiles are not the best for a high traffic area. The instructions say not to use any additional adhesive, but I don't see how you can get away with just the adhesive that's on the tile. The edges do not stick very well. I had to stand on them and press hard, and even then some did not stick as well. Since these are going under my washer and dryer I was not overly concerned, but in a kitchen or hallway where there is a lot of foot traffic, these may not be the best choice. They look and feel beautiful, though, and it really did update the room considerably. Oh, the black marks on the wall? That's caused by the washer hose. I tried cleaning it with a Magic Eraser. It would not budge.

Next was the wallpaper. I didn't stop to take pictures of the process because it was hard and tiring. Thankfully my son E helped me with this. Word to the wise: don't try to do this without some help. It will go much easier if there are two people working on this. The wallpaper is also peel and stick; similar to contact paper but not as stiff. It is, however, extremely sticky and will stick to itself. On the bottom left hand corner there where it looks like a piece is missing? That's where I didn't move fast enough, the paper stuck to itself, and when I tried to unstick it, it tore. That was the hardest part. Of course the walls aren't square or straight but we managed to get the paper pretty level by drawing a line on the wall to follow. Even cutting around screw holes and fixtures was pretty simple. This paper is meant to look like wood boards, unpainted shiplap if you will. When I put up the first shelf to see how it looked, I did a happy dance! 

The wallpaper wall is an accent wall. I didn't want to wallpaper the entire closet; that seemed like too much. Once the second shelf went in and we put up the outlet covers, the washer and dryer were ready to go back in. Oh my gosh, I was so happy and excited! It looks so good! What an improvement from what it looked like before!

I know it's only wallpaper, but the difference is night and day. It's exactly what I wanted.

I put everything back on the shelves and I'm loving it! I might eventually switch out the plastic gray bins for wood ones. These were my daughter's from whenever she was teaching, and since she didn't want them anymore I decided I'd use them here, but I think I'd prefer wood or wicker baskets here. I'm in no rush; if I find something at the Goodwill I'll pick them up but otherwise these work fine.

As for the floors...

You just get a little peekaboo, but it makes me smile every time I look at it. There's space in between the washer and the dryer, so I'm glad I tiled the whole floor, otherwise it would have looked terrible. 

This whole project cost me under $65 but to me, the transformation is priceless. It proves that it's possible to have a beautiful home on a budget. Which reminds me, the master bedroom tour is next, and that's gonna show some of my best frugal skills, so come back soon! God bless y'all.

Wednesday, August 5, 2020

Let's Take A Tour - The Laundry

If I could point to one space in my old house that I didn't like, it would be the laundry area. My washer and dryer were in a corner in the hot, humid, dusty garage, underneath the water heater.


I loved the washer and dryer themselves; I bought them from Lowe's in 2016 after my washing machine, which was original to the house, finally gave out. These front loaders worked so well and were wallet-friendly, since they use less water than the old style top loaders. But I was constantly having to clean them because of all the dust in the garage. I knew in my new house I would want both a garage and a washer/dryer, but not together.

Thankfully, I was able to get just what I wanted in my new house. Sort of...


Down the hallway next to the kitchen, adjacent to the dry bar, is the a/c unit on the right, the master bedroom straight ahead, and on the left a laundry closet. Not a room, just a closet, but it's not in the garage so that's a plus.
 
It has a working washer and dryer (though older models), and wire shelving above it for storage. I was very thankful for it, but I didn't love it. Heck, I didn't even like it. It was very dirty. The laundry closet is a forgotten space; if, like the previous owner and myself, you don't have a need to do laundry daily, you don't give it a second thought. It's a utilitarian space and nothing more. Until you're moving in your stuff. That's when you start to notice things. Like how sticky the wire racks are because of years of laundry and humidity in the room. Or the amount of dust inside the brackets when you try to clean said wire racks. Then there's the washer and dryer themselves, covered in sticky dirt. I tried to clean them; I used soapy water and microfiber cloths on everything. The washer and dryer I was able to get fairly clean, but those wire racks were a whole other story. No matter how much I tried to clean them they were just as sticky and gross. This needed more than just some basic cleaning. This closet needed a makeover.


I took the wire racks down and replaced them with wood racks that I found at Home Depot for $9.99 each. They aren't solid wood; these are covered in laminate, which is why they're so inexpensive. The brackets were the most expensive part of this makeover. They were $7.47 each but I needed 6 of them to make sure the shelves were secure. They look so good! And they're much easier to keep clean. On the wall I put up hooks to hang my mop, broom, and plastic bags. 


Outside the closet I put up this cute Laundry sign that I picked up at Hobby Lobby for just $9.99. It gave color to this otherwise neutral space.


I changed the light fixture here in the hallway in front of the laundry closet. This was one of those white glass ball fixtures that contractors use in new construction, except this house is over 30 years old and so was the light fixture. I picked this one up from Walmart.com for $16.34. I wanted something in oil rubbed bronze and that wasn't closed, since those tend to get dirty and full of bugs. Can anyone say yuck?! I don't have that problem with this light fixture. 

Just recently I made a few more changes to the laundry hallway. I had this picture on the wall that I got years ago from Kirkland's:


This has been a favorite of mine for years, and I knew I wanted it in my home, but I had to admit it looked small on this particular wall.


I thought about maybe doing a gallery wall here, though I'm not fond of gallery walls. Thankfully my daughter offered me this gorgeous painting:


She had bought it for her bedroom but decided on doing a different color scheme so she asked me if I wanted it. I knew the colors would work with the master bedroom so I said I'd take it. When I saw it, I knew it was perfect for the hallway just ahead of my bedroom.


The size is much better on this wall. I added the runner, a steal at $14.97 from Costco. The colors work beautifully with my decor.

Most of the makeover was done back in March, right before quarantine. It's been a great improvement, but I knew there was more I wanted to do. For starters, the smoke detectors in this house are so old they've yellowed. I don't even understand why there are 2 smoke detectors in this small hallway, but both are dingy looking. I want to get those replaced or at least painted. The bifold doors are another project on my list; they're metal which makes them creaky, and they also have yellowed. I want wood doors, or at least something that looks like wood.


This is the wall behind the washer and dryer, just below the shelves. I didn't realize how stained the wall was until I put the new shelves in. I thought about painting it, maybe even in a contrasting color, but I've decided on something else: wallpaper. I found some on Amazon that I've ordered. Hopefully I can start on this next week. I think it'll give this laundry closet a boost. That, and the flooring...


Again, no one looks at the dingy laundry closet floor but the homeowner, so it's never a priority. But I look at it and I hate it. This linoleum has been here for over 30 years. I took the washer & dryer out and tried to give it a good cleaning, but it's just too old. The color has yellowed and the dirt is encrusted into the grooves, so it won't come out. To take this out and put in ceramic or porcelain tile would be tedious, expensive and unnecessary; only a small piece of the flooring actually shows. Instead, I've found a better and easier alternative: peel and stick tile. I looked at Home Depot and Lowe's but ultimately found what I was looking for on, you guessed it, Amazon. I'm excited to get this project started and to see my vision come to life.

I'll try to remember to take pictures this time as I work on this area ;-). Next up in the home tour: the master bedroom. I can't wait to share this special space!

Sunday, April 28, 2013

The New Addition to the Household

I've been wanting to post about this for the whole week - well, since Wednesday when they got delivered.  But let me give some background first.

We've been living in this house for the past 13 years.  It was brand spanking new when we moved in.  Through the years we've replaced bathroom tiles and cabinets, kitchen cabinets and appliances, floors, even the air conditioning unit.  For the past couple of years our washer and dryer have been barely working, though, and I'd told the Mister they needed replacing soon.  Since I didn't make a big huff about it (after all, we were supposed to be moving out of this house) the old washer and dryer stayed.

The past few months the machines really started quitting on me, especially the washer.  It was a top loader with the rotating mechanism in the center.  Or what was supposed to be a rotating mechanism, since it had stopped rotating years earlier.  The top half didn't rotate but the bottom did so the clothes got semi-washed. Now the bottom portion had also stopped rotating, so basically the clothes sat in soapy water, then the water got dumped, then it sat in rinse water, then the spin cycle which occasionally wouldn't work either and I'd have to repeat it.  Towels and a blouse of mine got ruined with fabric softener because of the clothing not being properly distributed.  The dryer wasn't doing a whole lot better; it was taking an hour or more to dry a basket of clothes.  Energy efficient they weren't.

Of course, the nice new energy efficient machines cost money, and I couldn't afford to get new ones or even get the old ones repaired (not that I thought it was worth it; they'd been repaired 3 times over the years already).  That is, until my income tax return arrived.  The time had come to replace the old machines.


Say, Goodbye Old Dryer.  You served me for a long time.


I said goodbye to the old washer too.  I'm so glad Home Depot not only delivers new appliances, but they take the old ones away for free.  I'd never had been able to get rid of those "antiques" any other way.

Speaking of which, Home Depot has an incredible sale going on till May 1st (no, they are not paying me to say this.  I just want to share the great deal I got).  These are the new washer and dryer now occupying the space of the old:


Aren't they gorgeous?!  But here's the deal:  Regular price for these LG washer and dryer is $999 each.  They were on sale for $886 each, but with an additional 10% off till May 1 I was able to get them for $798 each.  Still a chunk of change, but when you consider that I can wash in one load what used to take me 2 and 3 loads in my old washer, and that the clothes actually come out clean...the difference is noticeable.  Besides, my old washer and dryer's energy cost for the year ran into the $50+ each.  These beauties only cost $10 each for the year, AND the washer uses less water.  I'd say both of my new machines will pay for themselves in the long run.

And you want to know what else is great?  My kids are wanting to help with laundry now :-).  Can it get any better?!