Sunday, August 30, 2020

The Week In Review

Years ago I kept a log of what had gone on during my week. I'd been thinking about whether or not I wanted to start it up again, and finally decided I'd give it a shot. Here's a snapshot of the past week.

My son E had his first full week of college. He graduated high school (homeschool) two years ago, but couldn't decide what he wanted to do. I know many kids go off to college and begin studying only to change majors several times or leave before finishing. I wanted E to be a bit more sure of what he wanted to do before starting. He finally decided he'd like to try digital arts so that eventually he can go into gaming. I like the idea that digital arts includes many different employment possibilities for the future so he doesn't have to feel stuck if he decides to try something else. He's doing mostly gen ed's now which he isn't thrilled about but it's part of school. All his classes are online - which is what he did all throughout high school so he's adapting well. So far, anyway. It's only been a week.

I ordered a couple of dresses off of Amazon. I usually prefer going to an actual store and trying things out, but that isn't possible right now with the pandemic. Since I've ordered dresses from them before I decided to go with styles and sizes I'd bought in the past, a style I like because it's comfortable while still pretty.


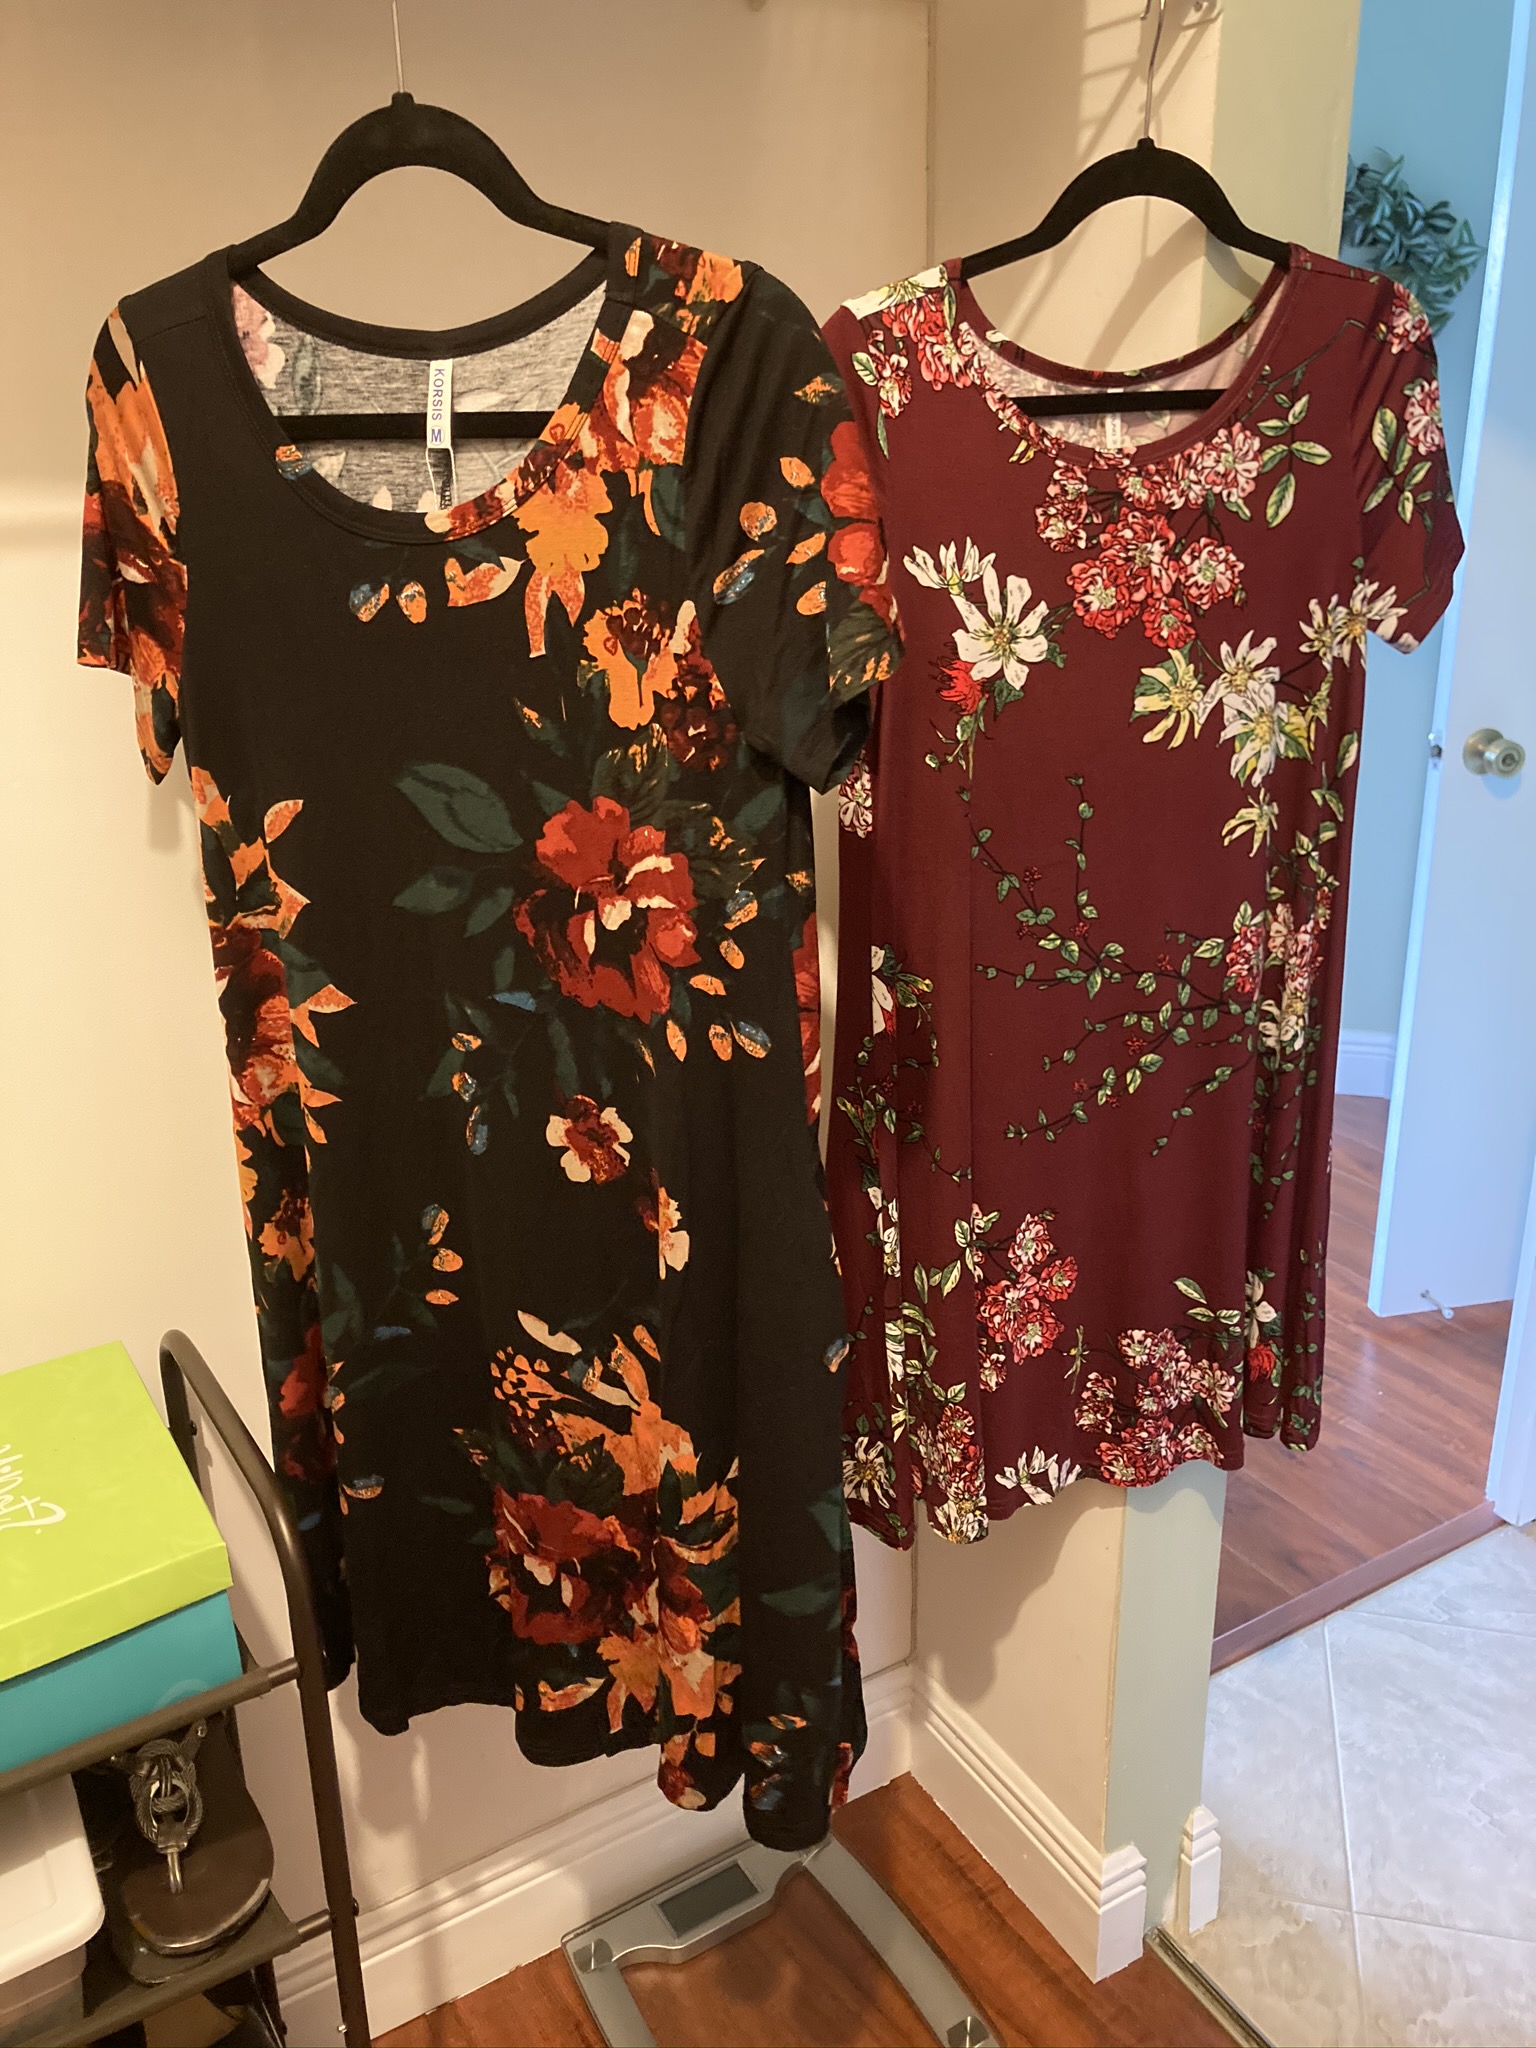
I wanted some fall color dresses now that we're coming into September, even though here in Florida it won't feel like fall for a couple of months yet. The dresses were both from Amazon but from two different companies. I was most excited and most disappointed with the one on the right. I love the burgundy color and the flowers, and the dress fits great, but it's missing one key component: it doesn't have pockets! I'd bought this style of dress before, though from a different company, and it has pockets. The dress on the left, black with those gorgeous shades of orange and rust flowers, also has pockets. I went back and looked at the description and it doesn't say that it has pockets, so it was just my assumption. I'm keeping the dress because it really is pretty. The fabric is 95% rayon and 5% spandex, giving it a t-shirt kind of feel, nice and light for our Florida weather. 

Before we moved to this new house I purged a lot of my decor because I was downsizing and I knew I wasn't going to need as much stuff (or have anywhere to put it). What I had was good enough for last fall, but now that I have the office/guest room completed, I knew I wanted to add a few items to my fall decor. I went to the Dollar Tree and TJ Maxx on Monday. TJ Maxx offers 10% off on Mondays to anyone 55 and older, and I love taking advantage of that deal.

Since there were two separate living spaces in our old house, a formal living room and a family room, I was able to have two different color schemes for my fall decorations. Both were in the modern farmhouse style, but the living room was done in cool tones of blues and greens while the family room had the traditional oranges and rusts. Whenever we found this house with its sage green accent walls I decided to keep the cool toned decor and declutter the traditional items. It looked really nice but I miss the traditional colors and wanted to incorporate some into my decor again. One of the easiest (and most inexpensive) ways to do this is with florals - Dollar Tree florals to be precise. I love that I can find gorgeous flowers in all different colors at the Dollar Tree without spending a whole lot of money. Here is what I picked up for $11.00:


This is more than just a cute little Hello Autumn sign. It's my color scheme. It does just what I wanted to do: mixed traditional orange with cool blues and greens. The orange is a little lighter than the traditional orange, perhaps, but it works. I used this as a jumping off point to pick my florals:


Light oranges and yellows are so beautiful this time of year! Our trees don't turn all the vibrant colors like they do up north; some do, but not till after Thanksgiving. This lets me bring those colors into the home, and they look so pretty against the cool blue of the blanket.


For the dining room I decided on a darker, richer, more formal color. These are even darker in person, more like a burgundy than dark rust color. I know they will stand out against the lighter colors in the house.

At TJ Maxx I scored some throw pillows that were $19.99 for the pair.


I had seen these in the store about a month ago. I'd even put them in my buggy, but then I put them back because it was an impulse buy and I'm trying not to purchase things that way. I knew the colors would be perfect, but I couldn't remember what I already had in my decor stash for fall. This time I went to TJ Maxx knowing that I wanted a couple more pillows either for the sectional in the living room or for the futon in the office. I was so glad I found these again - they were the last ones! These are great quality pillows, and the covers are removable so I can throw them in the wash if need be. They ended up being $9.99 each which is a steal, and the colors work with all my other decor.

On Thursday, after grocery shopping, I stopped by our local Dollar General. Believe it or not, I've never been in a Dollar General, but I saw Mrs. Falon from Moss Family TV on YouTube do a small decor haul of Dollar General items and I figured I'd go take a look. Our Dollar General had half an aisle's worth of fall decor that had already been picked over, so I was not impressed. I picked up these two little pumpkins...


...but I decided it's not worth going out of my way to go to Dollar General when Dollar Tree is closer and had a better selection. They were $2 each, one for my house and one for my daughter.

And those are this week's highlights. Off for some rest to prepare for the new week. God bless y'all.

Friday, August 28, 2020

Monthly Menu Plan

 Long before it became popular on YouTube, I began menu planning. With 2 (and later 3) kids, a husband, home and full time job, the last thing I wanted to worry about was what we would eat for dinner. We were never eating out kind of people. The only indulgence we had was our weekly Little Caesar's pizza, and even that was not always regular. We ate home cooked meals everyday. There had to be enough for dinner and leftovers for lunches the next day, so pre-planning was a must. On those occasions when I didn't meal plan, I was frazzled and stressed trying to put something together while figuring out if I had all the ingredients I needed. Meal planning help me keep my sanity.

Times have changed, seasons have passed. I no longer have little kids at home. I don't have a husband, and currently I don't have a job. Yet still, I meal plan. The reasons are simple: meal planning saves time, money, and gives me peace of mind. It helps me stay healthy because I decide what goes into each dish. We can have our favorites and still experiment and try new things. 

In the past I would menu plan for one to two weeks. I would shop my fridge and pantry first, then head out to the grocery store to pick up whatever else I needed. Then Covid hit, and we were quarantined. Everyone was told to stay indoors as much as possible, and social distance whenever it was necessary to go out. (I still wonder why it's called "social" distancing since keeping our distance doesn't make us very social). The first time I went to Aldi's whenever the quarantine hit, it was so uncomfortable. Not because of having to wear a mask (though yes, they are uncomfortable), but because of the obvious terror in people's eyes. The looks folks gave each other was evidence that everyone was terrified of this virus and believed everyone around them was a threat. I was afraid of getting close to people. Once on line to get into the store a lady in front of me told me I was standing too close to her and I needed to back away. Y'all, I wasn't even at arm's length, but that's what fear does to people. I decided to change my meal planning to once a month, so that I could buy most of my groceries at Aldi's at the end of the month for the following month and do fill in grocery stops in between. The results have been better than I expected. Not only have I been able to avoid unnecessary trips to the grocery store, I've also saved money at a time when prices have steadily gone up. 

Here's what I do. A week before the new month starts, I pull out my planner and start filling in meal ideas:


I don't fill in weekends because we usually have either leftovers, frozen pizza, or sandwiches. This helps keep the amount of wasted food to a minimum. I don't put the meals in the order that I will prepare them. In other words, just because September 29 says tacos doesn't mean that's when we will have tacos. As the cook I reserve the right to make changes as I see fit ;-). What I do here is simply come up with meal ideas so that from there I can create a shopping list.

Step one is to go through the pantry. I don't do this until a couple of days before I head out to the store so I have a better idea of what I need. I prepare a spreadsheet (because I'm type A) with all the meals, sides, and snacks that we'll have. I break down the meal by ingredients, then bundle the like ingredients so that I have a full shopping list. For example, if there's 4 meals on the menu containing 1 to 1 1/2 pounds of ground beef each, I count the amount needed in total, then put 5 pounds of ground beef on my shopping list. 

Step two is to transfer my shopping list from the spreadsheet to my phone. My daughter gave me an Alexa device a couple of years ago, which has made my life so much easier. I call out my shopping list to Alexa, who writes it down on the app. Then, whenever I get to the store, my list is handy and I can check off everything as I go. It's also convenient to have Alexa in the kitchen. Whenever I see that I'm running out of something, I just call out, "Alexa, add (fill in the blank) to my shopping list," and she takes care of that for me. 

This month, I began meal planning for September on August 22. I have my cookbooks, and a list of our favorite meals, plus the meal plans for the past few months that I can refer to as I decide what to make for the new month. As the days go by, I might adjust or add something to the list. I didn't prepare the shopping list till August 25. As I looked it over, I decided whether I would need certain ingredients or if I had enough to last through the month. Finally, grocery shopping day was August 27.

My first stop for my monthly grocery haul is Aldi's. I find that they have most everything I need at the best prices. Even Walmart can't compete with their quality and prices in my experience.


This is my fridge haul. We don't eat a lot of dairy so you won't see tons of cheeses or yogurt. There were also a lot of things I didn't need to buy, such as almond milk, because I already had enough to last me a couple of weeks.


My freezer haul was a bit bigger because I typically buy all or most of my meats from Aldi's. I bought 5 lbs. of ground beef, a 2.5 lb. bag of boneless skinless chicken breasts (I have chicken tenders in the freezer that didn't get eaten this month), burgers, pork chops, spare ribs, and bulk sausage for sausage gravy. I was able to find mixed vegetables but not frozen corn, which was strange. I did pick up some frozen sweet potatoes for my turkey chili (I have a 1.5 lbs. package of ground turkey in the freezer). Before putting the ground beef away I split it up into smaller packs:


I write down what's in the freezer bag, the amount and date. This makes it easier to pull out and defrost whenever I'm ready to use it.


I'm thankful for my nice roomy pantry, because I can fit all of this food in it without overcrowding. The bread and burger buns go into the freezer; I pull them out and defrost them whenever I'm ready to use them so they last longer. Bread can be frozen without any ill effects. Once they thaw out they are just as fresh as when I first bought them.


I also picked up some household items from Aldi's. The Tide detergent I believe was an Aldi's Find, meaning something they don't normally carry and will only be there for a limited time. I got this big jug for $8.94 which I thought was a good deal. Their Radiance brand is just as good as the name brand and I don't mind paying less.

Whenever I set everything out to be rung up by the cashier, I was sure the total was gonna be about $150 - right at my budget. There was a lot of meats, plus the laundry detergent and everything else. I was very pleasantly surprised to find my total was $123.93. That was a relief, because while I did find almost everything on my list, there were a few things that I didn't find and I'd have to get from Walmart. Thankfully my Walmart haul was much smaller.


My son doesn't like drinking water unless it's flavored, but he also doesn't like the saltier taste of some flavored waters like La Croix. I used to buy Winn Dixie brand flavored water, but I don't have a Winn Dixie very close to me anymore. I bought several different types of flavored waters, and every time he was disappointed. Then I heard a YouTuber talk about the Clear American brand at Walmart which supposedly tasted sweet. I bought a bottle of the mandarin orange for him to try. I heard him in the kitchen whenever he tasted it and he said, "Ooh, this is good!" Even he was surprised! He gave me some to taste, and I have to say I personally did not like it. It is beyond sweet. He loves it, though, and since it has no sugar, no calories, and is cheaper than the Winn Dixie flavored water, I don't mind it at all. He's tried several flavors since then and his favorites are the mandarin orange and black cherry. 

Aldi's didn't have bacon so I picked up what I could find at Walmart, which wasn't much of a selection either. Aldi's also didn't have paper towels; I hated paying $4.97 for this two pack at Walmart but my only other option would be Publix and that would be even more expensive. There was no frozen corn at Walmart either; I guess there's a shortage. I had to get fettuccine noodles, toothpaste and buttermilk from Walmart because Aldi's doesn't carry any of those. One of the few things I don't like from Aldi's is their popcorn so I picked up the Great Value brand. My Walmart total was $26.73.

That brought my total to $150.66. Now, this is not all I will buy for the month of September. I will usually stop at Walmart once a week or once every other week for produce, water, milk, and anything else I run out of that can't wait till the following month. I budget $400 a month for groceries with an additional $20 a month in case we do happen to go out to eat. I've been able to stick to my budget even though food prices went up dramatically in April and are only just starting to come down again. I remember I was paying $2.99/lb. for ground beef at Aldi's before the pandemic. It skyrocketed to $3.99/lb. and wasn't always available. Now it's down to $3.49/lb. and I'm hoping it'll continue the downward trend. 

That's a glimpse into my monthly meal plan. I always suggest everyone try meal planning at least once. I can almost guarantee your life will change for the better. 


Tuesday, August 25, 2020

Let's Take A Tour - The Guest Bathroom

The guest bathroom is to the left of the staircase, beside my son's bedroom and in front of the linen closet.

It's also beside the office, which in the original plans for this house was the third bedroom. The best thing I can say about it is that it's in a convenient location. It's also eerily similar to the guest bathroom in our old house. The only difference is the placement of the door.

It's a very small bathroom. Has everything it needs and nothing it doesn't. I could have skipped touring it altogether, but there's a few things I'd like to do with it in the future so I figured I'd share where we are with it now.

This is what you see whenever you walk into the bathroom. It's been nicely updated, nothing fancy and everything classic so that any design style will work with it. I really like that about this house. I can decorate this with any farmhouse style just as it is. I can paint the vanity and change out knobs for a more modern look, or a shabby chic look, or a boho style. It's neutral enough that it adapts to whatever decor gets thrown at it. And it's functional, which is what everyone wants their bathroom to be. I like classic with a touch of rustic, so the white tobacco basket I found in the clearance aisle at Walmart fit the bill. I added the bronze metal butterfly that I picked up at Hobby Lobby to complete the look. These two items were in the master bedroom in my old house, but I felt they looked better in here.


The vanity is small, so I keep only the essentials on it. It still looks busy to me, though. Just above the vanity, to the left of the mirror, I can tell there was a medicine cabinet at one time. The previous owner probably took it out whenever she remodeled because it was either unsightly or unused. Either way it took away some storage, even if just a small amount. My hope is to add shelving in the future, similar to what is in the master bathroom, so I can remove more things from this vanity top. The little potted orchid is from TJ Maxx. I added it to liven up the space, and it was just the touch it needed.

The shower curtain is from the Hearth and Hand collection at Target. I had this in the guest bathroom in our old house, and since it's a neutral color and design it worked perfectly in here. 

I wanted something above the towel rack because the wall looked so bare. I tried putting the tobacco basket here but it was too small. This wall art is from Hobby Lobby. I loved it the minute I saw it, and since it has the rustic wood along with the teal green flowers, I knew if it didn't work in the bathroom I could find another spot in the house for it. Thankfully, though, that wasn't necessary; it was exactly what this spot needed.

The only other room in the house is my son's bedroom, but we won't be touring that. It's his personal space and I want to respect his privacy. Of course there's also the garage, but there isn't much to see there except my car and some storage containers. I might do a tour whenever I start decorating for fall, since my fall decor is in totes in my garage. It'll be easier to show that way.

It took a few months, but we're finally caught up with the present day. Of course there will be more changes; there's already been changes that I haven't posted about yet! September is just around the corner and everyone is decorating for fall. I love decorating, I love fall colors, but the fall isn't my favorite season. At least not till November when hurricane season ends. At this writing, Tropical Storm Marco reached the Louisiana/Texas coastline a couple of days ago but fizzled out. Hurricane Laura, however, is gaining strength and headed in the same general direction. Meaning, Louisiana and Texas need our prayers. The weatherman says it'll most likely become a major hurricane by the time it reaches land, but Jesus commands the storms, not the Weather channel. 

There's plenty more I hope to be sharing on my blog soon. I hope you'll come back and sit with me awhile. God bless.


Wednesday, August 19, 2020

Let's Take A Tour - The Master Bathroom

 In my old house the master bathroom was remodeled and updated back in 2009. I did several posts on it and the final reveal is here. I loved the finishes I'd selected, but the bathroom always seemed an odd space to me. Whenever you walked in, there were two walk-in closets, one to the right and one to the left. Once inside, the vanity was on the left, the toilet and bidet were on the right, and straight ahead was the garden tub/shower. In the middle of this was a large, empty space. While it was nice to have a large bathroom, it was a lot of wasted space. The bidet was almost never used. A stand up shower would have been a much better choice, and there was more than enough room for it. We remodeled this bathroom out of necessity: the tiles around the tub started to fall out. After months of going back and forth with the insurance company we finally got a settlement, but it wasn't enough to do major remodeling. We put in all new tile and a new vanity but kept everything else where it was. 

When the time came to find my new home, I didn't give the master bathroom much thought. I wanted it to be functional, of course, and pretty, if possible. I hoped I could have a garden tub again - while I only take showers, I like the size of the garden tub. More than anything, I hoped it would already be remodeled. I knew I could afford to have it redone, but I didn't want to spend money on it. God heard my heart, and boy did He deliver!

The door to the master bathroom is a pocket door, just like every other master bathroom I've had here in Florida. I like the tile in the bathrooms. It isn't the same tile as in the rest of the house; this tile is in both bathrooms and the entryway, and it's a tan color. 

The sage green color from the master bedroom continues in the bathroom, and since it's a favorite color of mine I decided to use some of my old decor and incorporate new items using this lovely color as well. The shower curtain is from Target. I was able to buy it with a gift card I received from my church back home on my last day there. It was such a sweet surprise, and so appreciated. I also got the small square rug at Target. I want to change that out eventually, since it's kind of small for the space.

I know this vanity and mirror don't follow the current trend of white and gray everything, but it is exactly what I would have chosen. I love rich, dark wood tones. This comes off a little more orange than it is in real life. I love the oil rubbed bronze fixtures, and the handles are the same ones I had in my kitchen at the old house. I kept the decor on here very simple: hand soap, a lotion dispenser I picked up at Ross for $4.99, and everything else is from my old house. The wooden tray was a gift from a neighbor. The candleholders are from Walmart and the green candles (which I already had) were a clearance item at Target. The little green vase is actually a votive holder I found at the Target dollar spot a couple of years ago, and yes, it too is sage green. The round mirror is from Walmart, I believe.


Above the towel holder are two wall art pieces that I've had for about 20 years. I got these at Burlington Coat Factory, and for years they hung in my dining room. There was no place for them in my new dining room, but I was thrilled when I saw how perfectly they looked here in my bathroom (notice the green stems on the flowers - sensing a theme here). The hand towels I got from Costco. Their towels are the best, and the prices can't be beat for the quality.

Y'all, whenever I walked into this bathroom I did a double take. A garden tub! I did not think I would actually find a house with a garden tub. It made me so happy!

I also love this little potty room (Haha, yes I know, it's called a water closet. I think potty room sounds more fun)! I really like the layout of this master bathroom. It's much smaller than my old bathroom, but the space is used so efficiently that there is space to move and plenty of privacy. I looked all over Pinterest to see how I wanted to decorate this area. I wanted some decor, but nothing over the top since it is such a small space.

I already had the towels from my old house, and the colors worked perfectly, but when I put the old artwork that I'd used in my old bathroom the color was completely wrong. I knew I wanted something to replace it, but I hadn't decided what. Hobby Lobby made the decision for me. This white washed basket with the metal flower in the middle (yes, that's sage green) was on clearance for $11.24 - regular price was $45! The minute I saw it I knew exactly where I wanted it. Originally I put it above the toilet, but this is where I intended for it to go. I needed some type of storage for above the toilet, but I didn't want a storage cabinet. I decided open shelving would be a much better option.

I found this shelf, complete with brackets, at Ross for $16.99! I couldn't believe how well the wood matched the vanity - it looks like it's part of a set! I picked up the planter the same day for $6.99, and it completed the look. I can't wait to decorate this shelf for fall!

On the wall opposite the vanity is a set of mirrored doors - perfect for checking out my outfit before I leave the house! Behind these doors is the master closet.


I picked up the wood board with the hooks at Ross for, I believe, $12. The laundry basket is from Costco. The shoe rack is from Amazon. Most everything else came with me from the old house.

It is a very nice size closet, with more than enough room for my clothes and storage. It's a room I would like to tackle in the future, though. The racks are the same sticky vinyl that was in the laundry closet, and while these aren't in as bad shape, they aren't in the best shape either. Plus, the room isn't being utilized well. I would love to put in a closet system with shelves and drawers, but that will probably wait till next year, after I complete a few other projects. 

We are coming to the end of the tour! The next room is the guest bathroom, a small but cute room with lots of potential. See you soon!

Friday, August 14, 2020

Let's Take A Tour - The Master Bedroom

 Last year as we prepared for our move I had to make some tough decisions. There was sorting, packing, and a lot of decluttering. We were moving into a smaller place, and although this house is chock full of storage for such a small space, it was still much less than what I'd been accustomed to for the previous 19 years. I ordered the packing pod and made the commitment to take only what fit inside the pod - if it didn't fit, it had to go. I wasn't completely faithful to this promise; there were the items, such as clothes and toiletries, that we had to take to my daughter's house until moving day. There was also a TV cabinet that didn't fit in the pod that my son-in-law's parents graciously took to their house and brought back whenever we finally moved. But there was one room that didn't make it into the pod: the master bedroom. Once we had most of the furniture and boxes in, it became clear that neither the king size bedframe, mattress, box springs, or nightstands were going to fit. The pod was packed solid and there was no more room.  Yet I wasn't bothered or concerned about it. We'd had this furniture for 17 years - yes, that includes the mattress - and it was time for a change. As my realtor put it, the bedroom furniture represented the past, the marriage that had ended. I actually looked forward to upgrading and making the master bedroom a place that looked and felt like me.

Of course, it meant shopping the way I like to shop: on a budget. As I sat in my daughter's dining room waiting for closing day, I scanned furniture sites like Wayfair, Overstock, Target, and of course my fall back, Amazon. I knew I wanted something classic, something that looked fresh without being too modern or trendy, that would stand the test of time. I looked at a lot of furniture, y'all. I'm happy to say I found what I wanted and I couldn't be happier.

I ordered my bed and mattress off of Amazon. I'd bought my son E a Zinus bed whenever his older brother moved to Central Florida and his dad sold the twin bed he'd had before. It's a good solid bed that's also pretty comfortable. Having experience with it before helped make the decision easy. The really nice part about this bed is that all the components come apart and fit inside the headboard. It made unpacking and putting together a breeze. I went with a queen size bed because, even though a king size would easily fit in this bedroom, I had no need for anything larger. That meant, of course, that I also had to buy all new bedding. I found the bedspread and sheets at Costco. I've purchased sheets from Costco before, and not only are they very affordable ($15.99 for the set that includes 4 pillow cases and one each flat and fitted sheets) they are so soft and comfortable! The same is true with this bedspread, which can also be used as a blanket and cost $19.99. I knew I could upgrade the bedding later on if I wanted to, but this is so pretty I'm in no rush. The throw pillows were ones I already had. The walls in the master bedroom are painted in the same sage green as the dining room, a color that is near and dear to my heart. It was easy for me to accessorize because many of my home decor pieces matched or complimented this color. And what about those wood floors?! They are laminate but a good quality, and they look gorgeous! 


I ordered the nightstands even before ordering the bed. These are the Picket House Channing nightstands from Walmart, and I love them because they have that classic, traditional look that pairs well with other design styles. I ordered two even though technically I only need one, but symmetry in design is a must for my brain. My original plan was to just get the nightstands and put all my folded clothes in there just as I'd done with my old furniture, but I ran into a problem. These nightstands are much smaller than my old ones, and only have two drawers where my old ones had three. Because of that I went ahead and ordered the matching chest of drawers. I decided against getting a dresser with a mirror because I wanted to find a makeup vanity instead. All the decor seen here are items I had in my old house except for the lamp. I purchased the set at TJ Maxx - or rather, I got them from there for free, thanks to a gift card I'd received. 

I looked for a makeup vanity from several different sites and stores, but all were small and expensive and not what I wanted. Ultimately what I found was a writing desk from Target that fit the bill (it's no longer available at Target but you can find it here):


I put it in a corner of the room where I could get some natural light from the window while covering what may not show very clearly in this picture: the internet router (it's behind my makeup on top of the desk). In this development, the association decided they didn't want the unsightly internet boxes in the front of the homes, so they put them in the back. This meant that, to get the best reception, the router would have to be in the room closest to the box (or at least that's what the internet provider explained to me). In my case, it means the master bedroom. This is pretty upsetting, because not only is the router there but so is that ugly cable and another box on the other side of the wall. My hope was that I'd be able to cover it with the vanity, but it didn't look right in the corner, and if I centered it the router would be on the floor in plain view. I needed another solution. This is what I came up with, and I love it.

Yep, curtains! Floor to ceiling curtains that cover everything on the floor but don't cover the window or the views. That was my main concern, and why I originally hesitated to add curtains. I didn't want to cover the windows and the lovely plantation shutters, nor did I want a long curtain rod over the window. Instead, I used two smaller curtain rods on either side, so that the curtains are just decorative. Of course, they're also functional, but they don't appear to be because the internet equipment is nicely hidden.

Here is what the bedroom looks like now whenever you first walk in:

The picture above the bed was in my living room at the old house, but it worked perfectly in here. I bought it years ago from Kirkland's. Other than the lamps, the only new thing here is the rug which I picked up from Ross for $44.99. I wanted something soft and cushy underneath the bed and this one looks and feels so lush! 


This is the view from the far left corner. I was using a dining room chair at the vanity for awhile. I looked for a chair for the vanity that would match the headboard on my bed, but they were way too expensive and not the right size. I found this chair at TJ Maxx for $39.99 and it's so perfect it looks like it came with the desk. The chair in the corner is actually a piece from the living room sectional. I thought it looked so good here in the corner and made it not look like a big empty space. The shelf on the wall was in the entryway of our old house. The metal art piece is new; I found it at Hobby Lobby. The wall looked so blank that I knew it needed something. Even my son E said it looked really good there.

The mint green pillows and the throw are from Walmart, and the lumbar pillow was a Target clearance find. I don't like to spend a lot on throw pillows; they can be very pricey and, let's be honest, they go out of style quick. Yes, I can buy pillow covers, but I've been able to find throw pillows for cheaper than some pillow covers - this one was just $8.

Even though I had to completely furnish this bedroom, I'm happy to say I managed to stay under budget. Everything that I bought - including furnishings, bedding, and decor - came to just over $1400.00. Some folks spend that just on the mattress! But even though I furnished it on a budget, it's still a cozy, comfortable room that I can enjoy and relax in.

Just outside my bedroom is the laundry closet, and the other door leads to the next space in this home tour - the master bathroom. Stay tuned!

Tuesday, August 11, 2020

We Interrupt This House Tour To Bring You...

 ...a laundry room makeover! In my previous post (you can read it here) I mentioned that I'd ordered a few things to update and make my laundry room (actually, laundry closet) into a room I liked looking at. I got my order on Thursday but I was dog sitting for my daughter who spent the weekend at Disney World with her husband and some friends. I didn't want to make a mess in the house while having a dog underfoot (and I mean that literally; he follows me everywhere). So I decided to get started on the work Monday morning.

I started by taking everything off the shelves, hooks, and the top of the dryer where I keep a laundry basket. I took down the shelves and gave them a good cleaning.

I took the covers off the electric outlets as well. I thought about switching out this outlet; the color is so dingy, like much of what was in this laundry closet. Ultimately I decided I wouldn't tackle that project just yet, not because I don't know how but because I was doing this on a budget and I hadn't planned on it. The outlet covers are less than $4 which was no biggie. I took a quick trip to Home Depot and got the covers along with a saw for a project I hope to do at my daughter's house. 

I took a quick pic of the wall before taking the washer and dryer out. Y'all, it looked awful! I was really looking forward to covering all this nastiness. But, floors first.

I spared y'all the worst of it. This is after having scrubbed the floor and baseboards with Krud Kutter, which I highly recommend. This product actually cleaned the linoleum better than anything I'd tried before. The stains, unfortunately, are there to stay. I decided not to paint the baseboards because they're hidden behind the appliances. The floor is too, and I actually considered tiling only the front that would be seen, but it's such a small space and I didn't want the machines to be on an uneven surface. 

I used vinyl peel and stick tiles. They are easy to use, easy to cut, and look really nice. This part of the project took about an hour to complete, and I'm thrilled with the results.

Isn't it gorgeous?!?! I will say this, these tiles are not the best for a high traffic area. The instructions say not to use any additional adhesive, but I don't see how you can get away with just the adhesive that's on the tile. The edges do not stick very well. I had to stand on them and press hard, and even then some did not stick as well. Since these are going under my washer and dryer I was not overly concerned, but in a kitchen or hallway where there is a lot of foot traffic, these may not be the best choice. They look and feel beautiful, though, and it really did update the room considerably. Oh, the black marks on the wall? That's caused by the washer hose. I tried cleaning it with a Magic Eraser. It would not budge.

Next was the wallpaper. I didn't stop to take pictures of the process because it was hard and tiring. Thankfully my son E helped me with this. Word to the wise: don't try to do this without some help. It will go much easier if there are two people working on this. The wallpaper is also peel and stick; similar to contact paper but not as stiff. It is, however, extremely sticky and will stick to itself. On the bottom left hand corner there where it looks like a piece is missing? That's where I didn't move fast enough, the paper stuck to itself, and when I tried to unstick it, it tore. That was the hardest part. Of course the walls aren't square or straight but we managed to get the paper pretty level by drawing a line on the wall to follow. Even cutting around screw holes and fixtures was pretty simple. This paper is meant to look like wood boards, unpainted shiplap if you will. When I put up the first shelf to see how it looked, I did a happy dance! 

The wallpaper wall is an accent wall. I didn't want to wallpaper the entire closet; that seemed like too much. Once the second shelf went in and we put up the outlet covers, the washer and dryer were ready to go back in. Oh my gosh, I was so happy and excited! It looks so good! What an improvement from what it looked like before!

I know it's only wallpaper, but the difference is night and day. It's exactly what I wanted.

I put everything back on the shelves and I'm loving it! I might eventually switch out the plastic gray bins for wood ones. These were my daughter's from whenever she was teaching, and since she didn't want them anymore I decided I'd use them here, but I think I'd prefer wood or wicker baskets here. I'm in no rush; if I find something at the Goodwill I'll pick them up but otherwise these work fine.

As for the floors...

You just get a little peekaboo, but it makes me smile every time I look at it. There's space in between the washer and the dryer, so I'm glad I tiled the whole floor, otherwise it would have looked terrible. 

This whole project cost me under $65 but to me, the transformation is priceless. It proves that it's possible to have a beautiful home on a budget. Which reminds me, the master bedroom tour is next, and that's gonna show some of my best frugal skills, so come back soon! God bless y'all.

Wednesday, August 5, 2020

Let's Take A Tour - The Laundry

If I could point to one space in my old house that I didn't like, it would be the laundry area. My washer and dryer were in a corner in the hot, humid, dusty garage, underneath the water heater.


I loved the washer and dryer themselves; I bought them from Lowe's in 2016 after my washing machine, which was original to the house, finally gave out. These front loaders worked so well and were wallet-friendly, since they use less water than the old style top loaders. But I was constantly having to clean them because of all the dust in the garage. I knew in my new house I would want both a garage and a washer/dryer, but not together.

Thankfully, I was able to get just what I wanted in my new house. Sort of...


Down the hallway next to the kitchen, adjacent to the dry bar, is the a/c unit on the right, the master bedroom straight ahead, and on the left a laundry closet. Not a room, just a closet, but it's not in the garage so that's a plus.
 
It has a working washer and dryer (though older models), and wire shelving above it for storage. I was very thankful for it, but I didn't love it. Heck, I didn't even like it. It was very dirty. The laundry closet is a forgotten space; if, like the previous owner and myself, you don't have a need to do laundry daily, you don't give it a second thought. It's a utilitarian space and nothing more. Until you're moving in your stuff. That's when you start to notice things. Like how sticky the wire racks are because of years of laundry and humidity in the room. Or the amount of dust inside the brackets when you try to clean said wire racks. Then there's the washer and dryer themselves, covered in sticky dirt. I tried to clean them; I used soapy water and microfiber cloths on everything. The washer and dryer I was able to get fairly clean, but those wire racks were a whole other story. No matter how much I tried to clean them they were just as sticky and gross. This needed more than just some basic cleaning. This closet needed a makeover.


I took the wire racks down and replaced them with wood racks that I found at Home Depot for $9.99 each. They aren't solid wood; these are covered in laminate, which is why they're so inexpensive. The brackets were the most expensive part of this makeover. They were $7.47 each but I needed 6 of them to make sure the shelves were secure. They look so good! And they're much easier to keep clean. On the wall I put up hooks to hang my mop, broom, and plastic bags. 


Outside the closet I put up this cute Laundry sign that I picked up at Hobby Lobby for just $9.99. It gave color to this otherwise neutral space.


I changed the light fixture here in the hallway in front of the laundry closet. This was one of those white glass ball fixtures that contractors use in new construction, except this house is over 30 years old and so was the light fixture. I picked this one up from Walmart.com for $16.34. I wanted something in oil rubbed bronze and that wasn't closed, since those tend to get dirty and full of bugs. Can anyone say yuck?! I don't have that problem with this light fixture. 

Just recently I made a few more changes to the laundry hallway. I had this picture on the wall that I got years ago from Kirkland's:


This has been a favorite of mine for years, and I knew I wanted it in my home, but I had to admit it looked small on this particular wall.


I thought about maybe doing a gallery wall here, though I'm not fond of gallery walls. Thankfully my daughter offered me this gorgeous painting:


She had bought it for her bedroom but decided on doing a different color scheme so she asked me if I wanted it. I knew the colors would work with the master bedroom so I said I'd take it. When I saw it, I knew it was perfect for the hallway just ahead of my bedroom.


The size is much better on this wall. I added the runner, a steal at $14.97 from Costco. The colors work beautifully with my decor.

Most of the makeover was done back in March, right before quarantine. It's been a great improvement, but I knew there was more I wanted to do. For starters, the smoke detectors in this house are so old they've yellowed. I don't even understand why there are 2 smoke detectors in this small hallway, but both are dingy looking. I want to get those replaced or at least painted. The bifold doors are another project on my list; they're metal which makes them creaky, and they also have yellowed. I want wood doors, or at least something that looks like wood.


This is the wall behind the washer and dryer, just below the shelves. I didn't realize how stained the wall was until I put the new shelves in. I thought about painting it, maybe even in a contrasting color, but I've decided on something else: wallpaper. I found some on Amazon that I've ordered. Hopefully I can start on this next week. I think it'll give this laundry closet a boost. That, and the flooring...


Again, no one looks at the dingy laundry closet floor but the homeowner, so it's never a priority. But I look at it and I hate it. This linoleum has been here for over 30 years. I took the washer & dryer out and tried to give it a good cleaning, but it's just too old. The color has yellowed and the dirt is encrusted into the grooves, so it won't come out. To take this out and put in ceramic or porcelain tile would be tedious, expensive and unnecessary; only a small piece of the flooring actually shows. Instead, I've found a better and easier alternative: peel and stick tile. I looked at Home Depot and Lowe's but ultimately found what I was looking for on, you guessed it, Amazon. I'm excited to get this project started and to see my vision come to life.

I'll try to remember to take pictures this time as I work on this area ;-). Next up in the home tour: the master bedroom. I can't wait to share this special space!